Showing posts with label chalk paint. Show all posts

Tuesday, 5 February 2019

Love Always

Dear all,
I made this scrapbook album for my friend who wanted to give memories to her son and daughter in law.
The size of the album is 8 inches by 9 inches
I have given little mixed media for the cover of the album
The album holds 50 photos


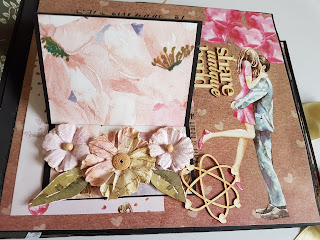


Hope you all love this album as much as I did making it.
Happy Crafting
Thank you for dropping by my blog.

Supplies Used
Bob and Betty PP
The Element Craft Studio PP and Heart mdfs
Mudra Chipzeb
Itsy Bitsy Handmade flowers / Sparkle paste / Mixed media Texture Paste / Stencils
Hndmd Hearts
Dress my crafts Embellishments and shakers sequins, tassels , pearls
Heart shakers Chipbords


Linking this to
pile it on challenge. ch 151-pretty-in-pink  23 02/03

creations in pink /ch6-anything-goes-in-mainly-pink 38 13/02

crafters cafe blog challenge 212  Fuchsia Color Foerest Green   23 13/02


prika all about crafts -jan  Shades of pink   07 10/02


moving along with the times 90-add-sentiment  78 13/02

crafty calendar challenge feb -add-texture  11 28/02

sir stamp a lot february-all-things-bright  17 27/02

crafty hazelnuts patterned paper  81 29/02

scrapping 4 fun ch133-love-wedding-anniversary 39 15/02

mini album makers/february  12 28/02 
hndmd. feb-2019 love-is in the air  09 28/02

mudra craft stampsfeb-2019-love  Have used Mudra Chipzeb  02 28/02


Sunday, 11 November 2018

Zig Zag Mini Album

Hello all,

Here is my mini album. Size is 7.5 by 7.5 inches
The pages open in zigzag manner . It can hold 30 plus pics of different sizes.

For the cover I have altered an embroidery hoop with laces, chalk paint, frames, threads,sequins, flowers leaves , sentiment tiles, metal corners

Do go thru the video to see how the pages fold unfold


Supplies used
Floral ballot watercolor paper
Embroidery hoop
Chalk Paint
Flowers
Leaves
Rose Chippies
Sentiment tiles
Sequins
Metal corners
Resin Frame
Laces
Jute cord
Leaf diecut
Droplets

Thanks for stopping by my blog
Happy Crafting

Meeta

Linking to

cards galore challenge /november ch 57 81 30/11

crafty sentiments anything-goes nov 76 13/11

crafty hazelnuts patterned paper nov  199 30/11

crafty friends challenge /challenge-96 68 16/11

stamplorations /november-mixed-media-challenge Altered Hoop 10 01/12


stamploration cutplorations-nov  03 01/12


we love 2 create challenge-14 anything creative mixed 20 30/11

a inky mess /challenge-25. 21 24/11

rhedds creative spirit nov 13 30/11

carabbie moments of craft challenge-156 45 19/11

just keep on creating november anything-goes 131 30/11

word art wednesday. anything-goes 360-361 96 14/11

ttcrd-anything-goes-challenge week 11/6/18  63 13/11

crafty creations challenges challenge-377 285 13/11

love to scrap challenge 115 107 30/11

crafting with an attitude /challenge-45 133 25/11

a bit more time to craft.-challenge-79 145 15/11

digi choosday wk-45 57 13/11

Saturday, 19 May 2018

Decoupage stand for the Itsy Bitsy Spotlight

Hello friends,
I am here with an awesome news that I have been selected as 'Crafter in the Spotlight' by the premium craft store Itsy Bitsy India.. So here is the project I made for the same with a pictorial tutorial.


You all can check my interview here Itsy Bitsy Blog


Here is the step by step tutorial for the multipurpose stand. Anything can be kept in it like stationary items, cutlery or even remotes.
Step 1
I took a mdf stand with three partitions and the Vintage Rose Tissue napkin.  I divided the stand in three parts with pencil.
**I must say the tissue napkins are so well individually packed that they don’t get any creases.**


Step 2
I masked the stand and applied Little Birdie Muted Teal chalk paint on the unmasked area.


Step 3

Now after drying I applied Little Birdie One step Crackle medium. I heat dried it and applied Little Birdie Snow chalk paint  to show the cracks 


Step 4
Now I took the tissue napkin and cut them in several pieces according to the design I want to place.  Always remove the white backing paper from the tissue, be careful.


Step 5
Now I arranged the tissue pieces all around the stand and adhere with Little Birdie Decoupage glue matt


I adhered several more pieces to give a better design as I felt that the stand was looking incomplete


Step 6

With the help of a stencil and Little Birdie 2 in 1 mixed media paste I gave the stand a little embossed effect. I gave the design randomly on all sides of the stand. After applying the paste on the stencil I removed the stencil and heat set it with Little Birdie Heat tool.


**Itsy Bitsy is making Crafters life so easy by placing the QR code on each product. I got a bit confused so I quickly scanned the QR code and the YouTube link was there to sort out all my confusion.  **

Step 7
I stamped little flourishes here and there to make the design look complete.


Step 8
I stamped little flourishes here and there to make the design look complete.


Step 9
I then applied VersaCraft Pale Aqua on the edges and the top.


Step 10
I applied Little Birdie Varnish Gloss all over and dried it.
I gave 2 coats of it to cover all areas.

Supplies Used


Final pictures of the completed multipurpose stand


I hope you all like it.
Please do let me know how you liked it.
Also attaching link to Itsy Bitsy Blog for my interview

Happy Crafting
Hugs
Meeta Bhalotia

Link to Itsy Bitsy India Blog for my interview and tutorial

Linking it to

altered eclectics /2018/05/may-challenge 27 31/05

crafting with friends 2018/05/ challenge-67 168 24/05

crafty sentiments 2018/05 pastel-colors-challenge 50 22/05

not just cards challenges 18/05/may 50 05/06

word art wednesday /2018/05/ weeks-334-335 283 23/05

http://cardsgalorechallenges.blogspot.com/2018/05/may-with-fred-she-said.html 153 31/05


Special 18 Card

Hello all, So here I am back to blogging after a break as I was busy crafting but just that I was not logging in here. Today I want to sh...